Overwatch 2 has recently been the talk of the town since Blizzcon. More people are diving into the world of Overwatch 2. Which is why in this dynamic and ever-evolving game, finding the perfect settings can make all the difference between victory and defeat. But don’t worry I am here to help! Here are the top 15 best settings for xbox 1.
15. Swap movement/looks (Off)
If it isn’t broken don’t fix it! If you grew up using the left stick to move and the right stick to look then I don’t recommend having this setting on. This could lead you to making mistakes in ranked games and can ultimately confuse you.
14. Invert Horizontal look (Off)
When the "Invert Horizontal Look" option is enabled, moving the mouse or joystick to the right might make the in-game view move left, and moving it to the left might make the in-game view move right. This setting is mainly a personal preference, and players choose it based on their comfort and habits.
13. Invert: V look (Off)
When "Invert Vertical Look" is turned on, moving the mouse or controller upwards will make your in-game view look downward, and moving it downwards will make your view look upward. Conversely, when it's turned off, moving the mouse or controller upwards will make your in-game view look upward, and moving it downwards will make your view look downward.
The preference for inverted or non-inverted controls is highly subjective and varies from player to player.
12. Camera Shake (OFF)
Whether Sigma is using his ultimate or a soldier is blasting his helix rockets you will notice that the camera will shake on impact. This is to give the player feedback. However this can get pretty difficult when it comes to taking cover, or trying to counter the enemy attack. It is best advised to turn this setting off so that way you can develop quicker and smarter reaction decisions.
11. HUD color (Any color option)
This setting can be found in the accessibility tab. There are 4 colors that can be changed such as; enemies, teammates, party members, and alerts. If you can not see any of the standard choices due to other visual settings or color blindness then it is important for you to play around with this setting. Seeing alerts from your team is going to be very important in ranked games. Every second counts and not seeing your team pinging the location of a flanking reaper could be your downfall.
10. Vibration (Off)
Now I know feedback is important but since the vibrations from the controller is so intense it could be holding you back from becoming that top 500 console Widowmaker. In ranked precision is key and if you choose a hitscan character like Hanzo aiming can be impossible if your controller is buzzing every 2 seconds. That’s you should keep that setting off champ.
9. Legacy Mode (Off)
Legacy mode provides console players with a smoother gaming experience when it comes to aim. It does this by lowering your aim assist when you perfectly track an enemy target. However as mentioned earlier Overwatch 2 is constantly changing. With the new and improved changes it is not really necessary to have this feature on. Unfortunately, it sounds like legacy mode just couldn’t keep up with the times.
8. Aim Technique: (Linear Ramp)
If you want your teammates to stop telling you to switch dps characters, and your aim to match your movement stick perfectly then you gotta switch your technique to linear ramp.
7. Crosshair Customization: (dot)
This is another setting that will vary on what hero you use and what you prefer. But the one that is used the most is the dot crosshair. It will help you make seemingless headshots as Ashe and help you get better tracking as Zarya or Sym. So take the chance to play around with it and get to practicing your aim!
6. Aim Smoothing: 0%
Aim smoothing is a setting that affects the responsiveness and fluidity of your aiming movements. It introduces a delay or smoothing effect to the movement of your crosshair, making it less twitchy or abrupt. This can be beneficial for players who prefer more controlled and precise aiming, as it reduces the impact of small, quick movements.
5. Aim Assist Window Size (30%)
The Aim Assist Window Size setting changes how big is the area around the crosshair where the aim assist will kick in if an enemy is inside it. Having this at a low value will help your aim not jump around in long-range shots where many heroes are moving around, and having it at a high value will be best for close combat.
4. Aim Assist Strength (96%)
Regarding Aim Assist Strength, even if you have the best aim, you’ll still want to turn on aim assist. Turning its strength up will allow you to take advantage of it more, and once you get the hang of it, you’ll be able to use it more efficiently. It’s worth using and turning up. When I first started, it was a godsend.
3. Aim Assist Ease in: (50%)
The Aim Assist Ease In setting changes how strong aim assist becomes the closer you get to the target. That means for hitscan heroes like Cassidy and Widowmaker, who need very accurate shots, having it closer to 100 is best. In contrast, for projectile heroes like Junkrat and Zenyatta, having it closer to 0 is best. Setting it as 50 is an excellent middle ground, but it may be one of the settings worth tweaking for each hero individually.
For Aim Ease In, it’s usually relatively easy to notice when the aim assist kicks in. You’ll feel a sudden shift in your aim, which may feel unnatural. Aim Ease-In smoothens that transition, and you can increase it further if you’d like to get rid of that snappy feeling when aim assist kicks in.
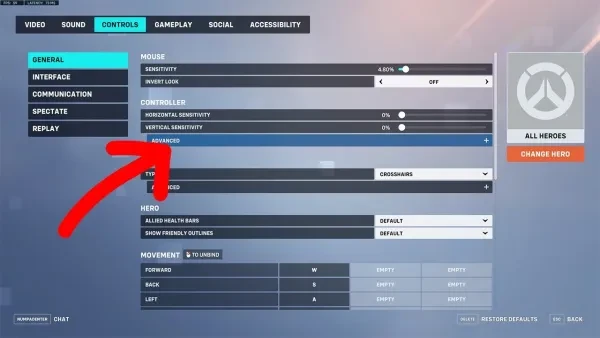
2. Vertical Sensitivity:42%
Vertical sensitivity, in this context, would likely pertain to how quickly your view moves up or down when you move your mouse vertically.
1. Horizontal Sensitivity 42%
Horizontal sensitivity typically refers to the sensitivity setting that affects the movement of your crosshair or viewpoint along the horizontal axis (left and right). It is a crucial setting for players to customize based on their preferences and playstyle. Higher horizontal sensitivity allows for faster horizontal movement, while lower sensitivity provides more precise control but may sacrifice speed. 42 gives the player an easy middle ground to work with.
Thank you for tuning in to explore the top 15 Overwatch 2 settings for Xbox One! I hope this guide helps you fine-tune your gaming experience, enhancing your skills and overall enjoyment in the game. Remember, finding the perfect settings is a personal journey, so feel free to experiment and discover what works best for your playstyle.
Recs:
10 Best Overwatch Settings That Give You an Advantage | GAMERS DECIDE
[Top 5] Overwatch Best Crosshairs (Used By The Best Players In The World) | GAMERS DECIDE
[Top 10] Overwatch 2 Best Aim Training Maps To Improve Your Aim | GAMERS DECIDE

