Visibility settings are crucial because they help you gain an advantage by improving reaction time and landing shots.
We have compiled the best settings for CS2 so that you feel like Hawkeye when playing the game.
In-Game Settings
All these settings can be found in the GRAPHICS tab in CS2’s in-game settings.
Boost Player Contrast
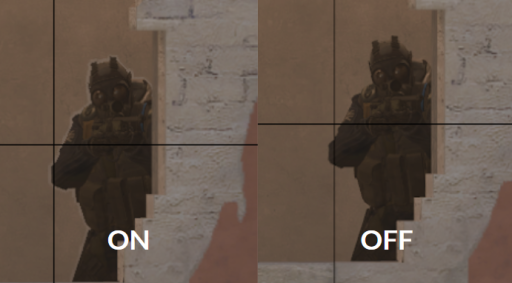
In CSGO, this setting increased the player’s visibility by making player models appear with higher contrast relative to their background.
However, in CS2, it’s a bit different. A thin white line is added around player models for this iteration of the Boost Player Contrast. Although this isn’t like Valorant’s red (or purple or yellow) outline for enemy player models, this significantly improves a player’s ability to see enemy models.
For this setting, we 100% recommend setting BOOST PLAYER CONTRAST to ON.
In CSGO, it would increase the player’s visibility by making player models appear with a higher.
Multisampling Anti-Aliasing Mode
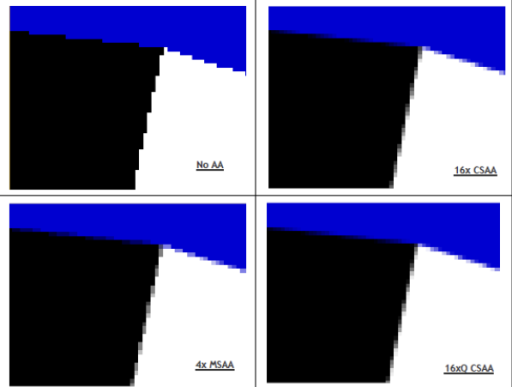
This setting, in short, smooths out jaggy models by “blending pixels”. When anti-aliasing mode is turned off, the edges of everything appear sharper and more “pixelated.
In CS2, turning it up makes a visual difference and can be easier for the eyes. However, after a couple of levels, it virtually looks the same.
Our suggestion is to turn this setting on to CMAA2. This gives a slight smoothness that makes the game look more pleasant but doesn’t sacrifice much performance.
Global Shadow Quality
There is no real change in terms of in-game qualities missing. No matter the shadow quality, shadows will appear. The only difference that the Shadow Quality changes is the sharpness of the shadow. The sharper the shadow is, the higher the quality it is.
For this setting, we suggest turning GLOBAL SHADOW QUALITY to LOW, as there is no difference in what you see.
Model/Texture Quality
To a certain extent, this is the same concept of Global Shadow Quality: the higher you have this setting turned up, the sharper player models and textures will appear.
Other than there being no advantage other than looking good, there is no real benefit or advantage. Because of this, we set this setting to LOW.
Texture Filtering Mode
This setting aims to increase certain textures, such as gun textures. When turned to the max (ANISOTROPIC 16x), there is no real FPS impact compared to BILINEAR.
Because of this, we advise turning this setting onto ANISOTROPIC 16x.
The purpose of this setting is to increase certain textures, such as gun textures
When turned to the max (ANISOTROPIC 16x), there is no real FPS impact compared to BILINEAR
Because of this, we turn it to the ANISOTROPIC 16X
Shader Details
Shader Details determine how light reacts and looks throughout the game. Like Texture Filtering Mode, it has little to no FPS impact.
Due to this, we leave this setting on HIGH.
Particle Details
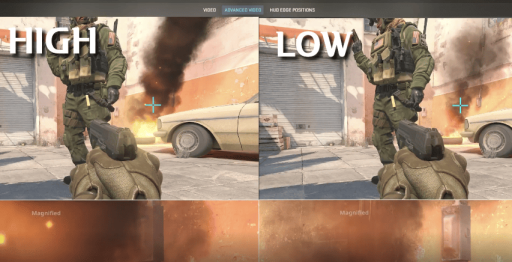
This setting makes particles such as explosions or fire look more “realistic” regarding the smoke, etc. Speaking of fire, the low setting will display less black smoke than the high setting when looking at a molotov.
The FPS impact is always quite extreme, so we will leave it set to LOW.
Ambient Occlusion
The primary function of this setting is to simulate natural light. Having it on has no real benefit, and the FPS price to pay is pretty high. So we suggest it to be left on DISABLED.
High Dynamic Range (HDR)
Most people have probably heard of this setting referred to as HDR. This setting makes bright spots look brighter and dark spots look darker. Even though it’ll make the game look better visually and competitively, it is a nightmare. For competitive play, you want to have consistent lighting throughout.
In addition to that, setting it to PERFORMANCE mode gives us an extra FPS boost.
FidelityFX Super Resolution
Even though it is more complex than this, long story short, it is just decreasing the resolution for most gamers.
Unless you need every possible frame, you want to DISABLE it because it will make the game look blurry and unclear.
NVIDIA Reflex Low Latency
This will take a while to explain, but this varies from PC to PC, so read carefully.
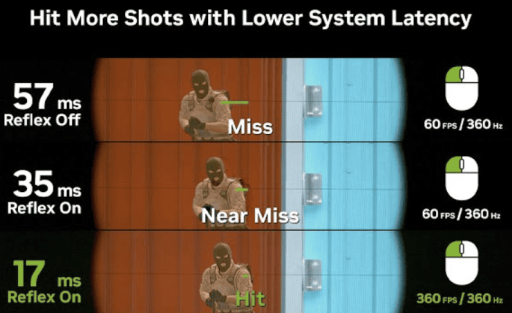
OFF: This option should never be selected. In the best case, turning it ON will reduce the latency. In the worst case, it doesn’t do anything.
ON: Always leave it on ON. If you have an older GPU, this will probably do wonders for you. It might lead to a 2 - 3% FPS drop, but the benefits outweigh the cons for this setting.
BOOST: If you have extra frames to spare, set this setting to BOOST, which will reduce latency even more. Otherwise, leave it on ON.ion
Resolution is a hot topic when it comes to CS settings. Some people play low res, some people play stretched res, some people play high res, etc. Now if you want the best visibility, we recommend the latter.
Higher resolutions = more pixels = clearer video. If your top priority is the visual quality, then higher resolution is the way to go (if you can spare those extra frames).
CS2 Console Command
Changing the gamma changes the midtones between light and dark, so adjusting it can create better-looking colors and thus give us an advantage.
If you don’t already have the developer console enabled, go into your settings → click on the “Game” tab → enable “Developer Console”,
After you have enabled it, tap on the tilde symbol “~” at the top left of your keyboard.
In the console, type “r_fullscreen_gamma_3” (excluding the quotations). Play around with the value, but what most people will find comfortable is “3”.
Done; your gamma is now optimized.
NVIDIA Color Settings
Most people have an NVIDIA graphics card (AMD users, sorry). You can do a straightforward trick to up the colors for CS2. Many pros and streamers use this method, so you better listen up.
Go to NVIDIA Control Panel → Vibrance Setting → Preference, but usually past 70%
Increasing the vibrance will make colors pop, potentially creating better opportunities to see your enemies.
Try it out; it might not be your cup of tea, but it won’t hurt.
Summary
There are a multitude of visual and visibility settings that you can use in CS2 to optimize your gameplay. Test them to fine tune your kill performance.
You can have an upper hand if you implement at least a couple of these settings. Now have fun clicking heads.
