![[Guide] 25 Best Dead Cells Tips and Strategies for Beginners [Guide] 25 Best Dead Cells Tips and Strategies for Beginners](/sites/default/files/styles/responsive_image_600xauto/public/2023-12/tips_for_beginners.png.webp?itok=3A1vXYuy)
1. Every run counts

Dead Cells is a hard game, and you’re going die a lot. Don’t worry, because with every attempt you’ll progress a little bit further! Enemies drop cells that can be used to buy upgrades, new weapons and mutations, and even costumes for your character! This means that no matter what happens in a run, you’ll be making progress; making yourself stronger, unlocking new options, and getting better at the game
- While the cells you get with every run will help you unlock upgrades, you can only use them when you make it to the end of a level. You’re better off spending your cells than losing them all trying to get more
- At the end of each level, you get a bonus for either completing it under a certain amount of time, or for killing enough enemies without taking any damage. Each of these doors give you 20 extra cells to put towards new gear
- When you unlock a new weapon, aside from being added to the weapon pool, you get a stronger version of it that can be used right away! Use this to your advantage, but don’t put off unlocking it for too long either
2. Don’t panic
Chances are this has happened to you before, at least once: You get hit by a monster, realize that it took out most of your health, try to quickly heal yourself, but then get hit by another enemy and now you’re staring at a Game Over screen. It can be frustrating, but there’s a better way to deal with those situations. If you kept a cool head, you would’ve noticed that before it drains, part of your healthbar turns orange. That health can actually be recovered by dealing damage, so instead of panic healing, stay aggressive and you’ll walk away feeling better- Try to take out all the enemies around you before trying to heal, and if you’re too low to try, find a safe area before using the flask
- If you’re trying to fight but notice an enemy behind you that’s about to attack, stop what you’re doing and dodge first
- The Recovery mutation gives you more time to get your health back
3: Be Aggressive

The best defense is a good offense. Combat in Dead Cells is fast and fluid, and the best way to win an encounter is to stay on the offensive. Keep moving, always be attacking something, and use all of the tools at your disposal! A moment of hesitation is all it takes for an enemy to get the jump on you, so charge ahead with everything you got!
- After killing multiple enemies in a row you get a speed buff, rewarding you for playing aggressively
- Some mutations give you bonuses for playing aggressively, like Combo and No Mercy
- Being fast is one thing, but it’s also important to keep using your skills. They’re your most powerful abilities, and have cooldowns short enough to refill before the encounter is over
4. When in doubt, dodge roll
One of the most important skills to have in Dead Cells is knowing where and when to roll. That’s because you’re briefly invincible while you’re rolling! I shouldn’t need to explain why that’s helpful, but that’s not the only reason you should be rolling. You have a better chance of stunning an enemy when you attack them after dodging, and overall you’re in a way better position after getting behind them- As useful as rolling may be, know where you’re going to land! You don’t want to roll off a ledge, or into even more enemies
- You move slightly faster while rolling, use that to your advantage when you’re going for the time bonus
- There are mutations that make your dodge roll even more powerful! Porcupack damages enemies that you roll through with the weapon in your backpack, and Armadillopack parries enemies attacks when you roll with the shield in your backpack
5: Look before you jump
You can do a downward smash attack by pressing down+jump at the same time, and you might want to use this all the time, but be careful! There could be traps waiting for you on the ground, and taking damage from some easily avoidable spikes is an embarrassing way to lose a killstreak. Take a second to look down and check the ground for anything you want to avoid- You can look around by tilting the right stick
- If it’s clear, by all means pound that ground! It’s a good way to get a jump on enemies, just be mindful about it
- If you notice some spikes that you want to avoid but you already started falling, you can cancel the downward smash by rolling mid-air
6. Experiment with different weapons and mutations
We all have our favorites, but with so many options you’re doing yourself a disservice if you only ever go for one kind of build. If you like using Brutality, maybe try a Tactics build for your next run. Who knows? It might be the one that gets you to the next biome! Even within the same stat color, there’s plenty of different weapons and mutations to try out. The only way to find out what works and what doesn’t is to test everything out- Sometimes a weapon’s description makes it sound underwhelming, but in practice it turns out to be much more powerful. Put aside your initial judgment and see what it can do
- An off color mutation can be surprisingly good with the right build. If you’re doing a Brutality build with a shield, for example, Counterattack might be a survival mutation, but it’ll work with the build
- You might have an aversion to weapon modifiers that make you take more damage, but the trade off is worth it! Take it for a spin, if you’re feeling brave
7. Risk V.S Reward
Dead Cells is a game that’s all about balancing risk and reward. Is the loot in that Cursed Chest worth it, or will I die in the next encounter? Should I go to the tougher biome with better rewards, or should I take the safe route? Can I take the exit now, while I can still get the time bonus, or go back and try to get the killstreak bonus too? Those are all questions you’ll eventually ask yourself while playing, and there isn’t a definitive answer. All it comes down to is how confident you are in your own abilities- If things aren’t going your way, you might hesitate to take a big risk, but that might be what it takes to get you back into your groove. If it doesn’t, well, you’ll have a better shot next time
- Every risk you take will be rewarded, and if you play too safe you’ll slow down your progress
- As you get better at the game, you’ll get more comfortable with taking risks, it’s how you get better
8. There are patterns everywhere
Dead Cells is a Roguelike, which means that every single run will be different, but there are still patterns within each level. There are specific types of areas that will spawn every time, for example every biome will have a Merchant somewhere. Not just that, but you’ll see parts of levels that sometimes repeat for each run. Enemies also follow patterns, repeating the same attack every time, and defeating them is a matter of memorizing what they do and how to counter it- Some biomes have “Lore Rooms”, with notes that give you information about the kingdom’s history. Some of these also have gold, weapons, or food hidden somewhere
- After playing enough times, you’ll start to instinctually remember parts of the level’s layout. It’s all trial and error
- Even if every enemy has different attacks, every single one will have an exclamation mark cue above their head before attacking
9. Explore every inch of the map
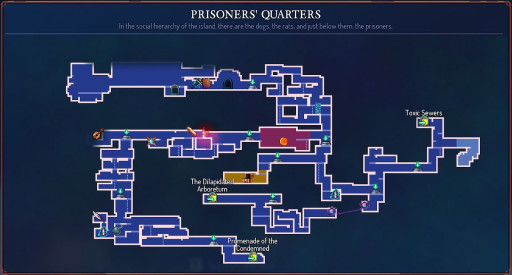
- Some areas have secrets that can only be found by exploring. For example, the Promenade of the Condemned has a tower that unlocks a blueprint after finding all 3 Gardener’s Keys
- If you’re not sure if you fully explored an area or not, check the map. You’ll see if there’s anywhere that you haven’t seen yet, and it’ll highlight any items left on the ground
- Don’t worry if you’re too far away from the next unexplored corridor, there’s portals everywhere that can fast travel to any other portal you came across, and there’s enough of them for you to reach every part of the map
10. What to unlock first

- After unlocking an upgrade, you should spend whatever leftover cells you have on new weapons and skills
- Later on in the game, you’ll be able to spend cells at the forge after beating bosses to increase the chances of finding higher quality items
- Certain upgrades need you to unlock a certain number of items first, but you can easily get those by buying items that don’t need a lot of cells
11. The Blueprint for success
At the start of the game, your weapon pool and available mutations are much more limited than what you have access to in the late game, and you might be wondering how you’re supposed to find these new options. Blueprints! Enemies have a slim chance of dropping blueprints, but each biome has a secret area with an exclusive blueprint, so go ahead and start looking for them!- Sometimes you need to find certain runes before you have access to those new blueprints, so if you can’t get to them yet, explore a different path and see if you can find a new rune
- The stronger enemies in later biomes have better odds of dropping blueprints, as well as enemies from biomes you don’t explore often
- If you unlock the Specialist’s Showroom, you’ll have access to the Hunter’s Grenade, a skill that forces blueprints out of enemies
12. Pick one stat and stick to it
You’ll come across Scrolls of Power that can upgrade one of 3 stats, Brutality, Tactics, and Survival. What many new players do is they’ll raise each stat by an equal amount, but you should put all of your points into a single category instead. It might seem counterintuitive to put all of your eggs in one basket, but each scroll increases your damage exponentially, so it’s best to try to maximize your damage- Brutality improves red colored weapons and mutations, and affects most of your melee weapons
- Tactics improves purple colored weapons and mutations, and affects most of your ranged weapons
- Survival improves green colored weapons and mutations, and affects most of your shields
13. Shields are better than you think!
Many new players refuse to use shields, after all why bother wasting a slot on something that can’t even deal damage, but not everything is about damage. With a shield, you can parry attacks and reflect projectiles, and the utility you get from that is way more valuable than just having another weapon. On higher difficulties, shields become an essential part of most builds- To parry an attack, tap the shield button just before an enemy attacks. You’ll see an exclamation mark above their head, which is your cue to parry
- You can also parry projectiles, reflecting them back at the enemy who shot it
- When you block attacks, shields absorb a percentage of the damage you would’ve taken, usually 75% but you’ll find shields that deflect more damage
14. You’re a Mutant, Harry
Mutations are Dead Cells’ version of Perks, passive upgrades that enhance certain abilities. At first, you’ll only have 3 mutations under each category, but as you progress you’ll find more blueprints and have access to way more options. The best mutation depends on what kind of build you’re going for, each mutation benefits a specific skill and playstyle, and it’s up to you to figure out which ones would benefit you the most- Your mutations should be the same color as your weapons. If you’re doing a Brutality build, for example, you should pick mostly red mutations
- You can reset your mutations at any time for only a thousand gold. If you ever need to
- Whichever mutations you pick, NEVER choose Ygdar Orus Li Ox. A skill that literally saves your life sounds useful, but there are other options that do a much better job at keeping you alive, and once it’s used you can’t get rid of it, wasting a precious mutation slot
15. Donate your body to science
Before you start a run, you can choose an Aspect that essentially works as an optional extra mutation. They can make specific abilities, items, and status effects more powerful, but if you equip them you don’t earn an achievement for beating bosses without taking damage, and if you manage to beat the final boss you won’t earn a Boss Cell (Don’t worry about those for now, I’ll explain later). So, Aspects are a good option if you’re having a hard time early on, but if you want those late game rewards you’re better off without it- Some Aspects synergize with mutations. Shatter works well with Frostbite, Relentless and Recovery make an excellent combo, and Assassin makes Predator overpowered!
- If you’re having trouble making it past the Toxic Sewers, Toxin Lover makes that biome a walk in the park
- You’ll only have 3 to start out with, but you unlock more when you die (Yes, really)
16. Conserve your healing items

- The Health Flask restores 60% of your max HP, so only use it when you drop below half health to make full use of it
- Before you use the Flask, check the map to see if there’s any food you left on the ground
- If you’re playing on higher difficulties, you have less flask recharges available, making it even more important to conserve them
17. Attributes can make or break your build
No two weapons you find will be the same, and that’s because of the unique attributes each weapon has. These attributes can make your weapons fire extra projectiles, deal more damage to enemies affected by certain status effects, make enemies spread effects to other enemies when they die, and so much more! Before you pick up a weapon, read it’s attributes to see what it can do- There’s an NPC in between each level that can reset your weapon attributes, which you can use to get the modifier that you need
- When choosing a weapon, don’t just look at raw DPS. The weapon attributes can make a technically worse weapon the better option if it works with your build
- Rare and powerful attributes will have a star next to them. When you find a weapon with one, keep it
18. Absolutely Stunning!

- There’s a modifier that deals 70% more damage to stunned targets, and a few weapons deal critical hits to stunned enemies. A weapon that has both will be incredibly powerful!
- Some enemies and bosses are immune to stun, like the birds in the Corrupted Prison or the Giant
- Just like the enemies, you can be affected by stun too! After falling long distances without slamming or after being hit by certain attacks, you’ll be stunned
19. Look for Runes
Runes unlock more areas within biomes and give you more paths to explore. Sometimes you’ll come across a spot that has something behind it, but it’s inaccessible for now. The only way for you to get there is to explore all the different areas in the game and find the Runes hidden within!- Some runes don’t just open up new areas, they also give you useful new abilities!
- If you’re having trouble finding the next rune, think back to the last one you unlocked. The next Rune is likely in the area that the previous one just unlocked
- There are a total of 8 Runes waiting to be unlocked, each one being vital for your success in the game
20. Use custom mode
As you progress, you’ll unlock more and more weapons, maybe too many. Some of them are better than others, and you’ll inevitably gravitate towards your favorites, but with the massive weapon pool and each item having an equal chance of spawning, it’ll start to feel like you rarely get to use your favorite weapons. Luckily, Dead Cells has a custom mode that lets you turn off any items you don’t like using!- Custom Mode comes with default presets that change the game drastically, but you can, well, customize the game in any way you like!
- You can disable any weapons you don’t like, but you can also set the starting weapons you want to use, at the cost of not being able to unlock any achievements
- If you feel like a challenge, Custom Mode also has several options that make the game even harder, like being able to turn off your upgrades, and having a timer that never stops
21. Wait until later before buying items
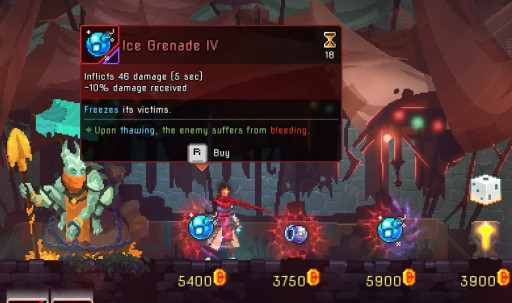
- The Recycling upgrade lets you restock the merchants items, so don’t worry about passing up on your favorites in the early game
- You should be in your third biome at least before buying anything, but ideally you should wait until after your first boss fight
- Ask the merchant if you can borrow their pan! If you haven’t already, it’ll unlock the Vorpan
22. The secret to beating bosses

- Don’t let the size of bosses intimidate you, you can still roll past them and block attacks with a shield, just like regular enemies
- Just like most other enemies, you should learn the bosses’ moveset. Keep your distance, and learn their attacks before rushing in
- Aside from keeping an extra weapon in your backpack, you might also want to consider changing your mutations before a boss fight. Mutations that give you buffs after killing enemies, just like weapon modifiers that do the same, are worthless in a boss fight
23. Practice fighting tough opponents in the Training Room
As you progress further, you’ll come across stronger enemies that you won’t know how to deal with since you haven’t encountered them before. They might end up getting the better of you, but that’s ok, because the same tricks won’t work against you next time! The Training Room is an area at the start of every run that you can use to learn how to fight tougher monsters without having to go all the way to the later levels. In it, you can choose your own gear and scroll levels, and pick the enemies you want to fight- Before an enemy is available in the Training Room, you need to kill it first
- You can also fight bosses in the Training Room, unlike enemies you don’t need to beat the boss before you train against it
- The Training Room is also a good place to test out builds, see what works and what doesn’t
24. Don’t curse yourself over being Cursed

- There are items that weaken the curse and make you stronger while cursed. The Aspect Damned changes curses so they double the damage you receive and deal, the Alienation mutation restores health after killing an enemy while cursed, and the Spite Sword deals critical hits while you’re cursed
- There’s more way to incur the god’s wrath than by opening the wrong chests. Breaking golden doors will curse you as well, and so does equipping the Cursed Sword and picking up a Corrupted Artifact
- If you’re cursed, take out weaker enemies to reduce your curse before going for the stronger ones in the encounter. 1 kill counts as 1 kill, and it doesn’t matter how you get it
25. “I finally unlocked a Boss Cell! Now what?”

- There are some enemies that only appear when you have active Boss Cells
- There’s a total of 5 Boss Cells you can unlock, each one being earned after beating the final boss on your highest available difficulty
- While you come across tougher enemies with Boss Cells on, you also come across better gear and have an amulet from the start
You may also be interested in
- Dead Cells Rune Guide: Everything You Need to Know
- Top 15 Dead Cells Best Mutations and Why They're Good
- Top 10 Dead Cells Best Melee Weapons

